Showing posts with label DIY. Show all posts

Tuesday, May 16, 2023

The Virginia Chainsaw Certification: Rated A


A couple of weeks back I finally did something I have wanted to do for some time, get my US Forest Service (USFS) Chainsaw Certification. I did this by being on the Governing Board of The Clinch Coalition (TCC) in Southwest Virginia. It is a two-day course with the first being classroom and the second in the field using a chainsaw. The classroom portion took place at the office of the Clinch Ranger District of the Jefferson National Forest in Norton, VA. The class was taught by Chuck Lane of the USFS. While I'm not a novice the class itself was mostly people with a lot more experience than myself. While long it was a good class and I learned a lot. I also got to try a new pizza place in Norton, Doughmakers.

Anyway, the main event was day two, and getting my hands on a chainsaw. We met in Norton and I rode with one of our evaluators over near Little Stony Falls between Coburn and Dungangon. It was an area burned in a forest fire so it had plenty of cuttable trees. When we got there they had to cut one of the trees out of the road. Once at the test site, we had to get ready to put on our PPE (Personal Protection Equipment). This entails chaps, a helmet, ear and eye protection, and gloves. Because I was going to get my chainsaw certification the USFS mandates PPEs. The fact is chainsaws are dangerous and I should have been using PPEs. Well, for today I borrowed most of my PPE from Uncle Sam, except gloves. 


Because this was my first time getting certified the highest rating was a Sawyer A. I got evaluated on felling and bucking three trees. I will admit I have bucked plenty (that is cutting a downed tree) but I haven't felled many. While I got off to a rough start with instruction from my evaluator Chris, by the third tree I had it down. It showed because when I got my Sawyer Certification Card it had feller added. Oh, when we got back to Norton the trip wouldn't have been complete if this Wood Booger didn't head to the Woodbooger Grill. A Wood Booger has to eat...  


Monday, March 13, 2023

The Post COVID Clock Was Ticking On Getting Some Maple Syrup Done!


Do you remember when I tapped trees back in early February...I didn't either and the time arrived to cook it down to Maple syrup. Actually, it was past time. I pulled the taps the day before I was diagnosed with COVID. So, my plan to cook down the sap was delayed because of being sick & then getting a "RONA" Rebound. After three weeks that meant the clock was ticking on the sap, I gathered (not to, also, mentioned what I had frozen last year). See, sap does go bad eventually. Since I already had sap in the freezer I didn't have room for more and it needed to be used eventually. 


So this weekend it was time...and I mean it takes a lot of time to make Maple Syrup. I started at 9 am and finished around 8 pm, that's 11 hours. At that time it is mostly about the gathering of wood and feeding the fire. For the first six hours, I had two pots, to which I add sap before boiling it off. Finally, I get it to one pot for two more hours. 


Around 6 pm it gets to the point where I need a more controlled boil and move it to an induction burner. Then it is 500° before it gets down to that final hour where I reduce the temperature and watch the candy thermometer get to 219° which time it is done. I always ask if is it worth the work? I keep doing it so I guess that is the answer...


Tuesday, February 23, 2021

Keeping The Eye On The Prize Of Maple Syrup Made The 10 Hours Worth It!


While it isn't just here yet one of my rites of Spring is the cooking of Maple Sap into Syrup.
As I said in the blog when I tapped Maple Trees just under three weeks ago this is my sixth year cooking down sap. 


As I have said many times this is a long, long process. Let me say that again...loooong. I originally was going to do this on Sunday but a number of things got in the way. I had biathlon to watch, it was really cold that morning (it is winter still) and I just wasn't feeling up to snuff so I put it off until Tuesday. I got up pretty early and it felt like winter out, but it didn't take long for it was more like Spring which is appropriate for syrup making.
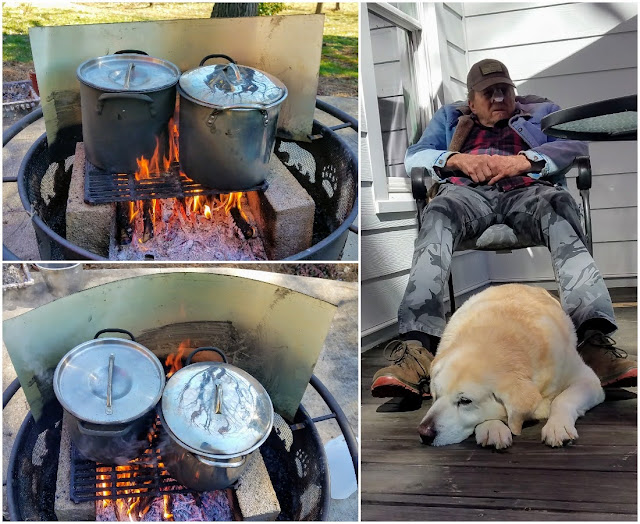
The first half of the process means feeding a lot of wood on the fire and pouring more sap in as it cooks. I don't have a really big pot so I have to use two. The process of adding sap goes on for over six hours as I quit this about 2 pm. Dad did have a good idea to put a reflected metal sheet behind the pots to keep the heat up. Then it was a few more hours as it cooks down. Then at about the nine-hour mark, I combined the pots (it is easier trust me). 


After this, the process picks up speed. At about 5:15 I took the liquid from the fire, poured it in a small pot, and put it on the NuWave 2 Induction Cooker. I can control it better, but last year I took my eye off the ball and boiled it out. I wasn't making that mistake this year and kept my eye on the prize and it paid off. I produced my biggest haul ever as I cooked down 750 ml (about 26 oz). It filled up a whiskey bottle! So, yes this was a successful year making that Tennessee Maple Sap...


Sunday, February 2, 2020

New Sap Opportunities In An Unusually Season


It wasn't all water and hiking at the Cabin but I did have a little time to tap some trees. The reason I say trees is that I just didn't tap a Sugar Maple, but I also did a Sycamore.
This is the first time that I have tapped trees at the Cabin. I picked the largest of the four maples out front. As soon as I drilled it, the pulp was wet and the sap started running out. Now when I tapped the Sycamore it was kind of dry. This is my second attempt at tapping them we will see how it goes.


The thing that this Sugar Maple got me thinking was how good this tree did as soon as I tapped it, much different than when I drilled the big trees in St. Clair. Frankly, the tap hole was dry and when I left Thursday morning (after tapping on Tuesday) versus the almost gallon I had overnight at the Cabin. So, when I got back to St. Clair... nothing! I read in my book How to Make Maple Syrup that you can cauterize the hole by accident when making it. So, when I got back to St. Clair I decided to re-drill, but this time I didn't reverse it which seem to work at the Cabin. To be continued...


Wednesday, August 7, 2019

My Upslope Is An Upgrade From Tarp Origami


I do blogs from time to time on hiking gear or as I call it Backpacking DYI and one of my favorites is shelters. I did a blog on Tarp Origami where I took an ordinary tarp and made a shelter out of it. Well, three things happened after that. First I had to use the cheap tarp I did the Tarp Origami to cover the spring at the Cabin. Then there is the number two reason. While the price of this 10X8 tarp is really good ($10) I decided I might want to use it somewhere else besides the Cabin. As I documented I did a solo hike and I thought if I did more than an overnight and I can't sleep at a shelter both nights this would be a lightweight alternative. My tent, a Kelty Salida 2, (with poles) weighs in at just under five pounds. The tarp is just under two pounds and uses my trekking poles, so I don't have to carry any. The third reason was I got a really good deal on the Kelty Upslope Tarp on Sierra.com.


I decided it might be a good idea to set the tarp up before I decide to take it out. So, this past Sunday I took it out in the yard for a setup. I remember the first time putting up my Kelty Salida 2  two-person and my Kelty Discovery 6, six-person tents and I struggled with both of those, but not like I did with this tarp. It came with guidelines attached and I couldn't figure them out. I had instructions, but they could have been a little better. As I was failing to put it up, a storm rolled in. I had just enough time to get it rolled up before the rains came.


After this, I thought it might be a good idea to watch some videos on YouTube. I watched a couple but Enwild's was the most helpful. So armed with this new knowledge I decided yesterday to try again. While the middle sagged a little more than it probably should I got it up to where I can sleep under it. I even tried more than one set up to test my skill with the guidelines. I was asked if I could sleep under it and I think I can, I mean I use to Cowboy Camp in my younger days. However, this doesn't mean I am ready to take it out. I still need to do a night out under it, which I will blog about. Right now I am confident this trap will work out.


Tuesday, April 23, 2019

Backpacking DIY: Making A Tent With Tarp Origami


I like DIY projects and today I had a little time before roof work so I decided to try my hand at making a tent out of a tarp.
The genesis of this project was wanting a tent for camping at the Cabin. I didn't want to use my main backpacking tent, but even a cheap tent is $40. Then I got my latest Backpacker Magazine and it had an article under Skill Set called Tarp Origami. It was an instruction guide on how to take a 10x 8x tarp and make a tent out of it. There were four designs but since two required trees on decided on the two that didn't.


The first was the easiest called a Holden Tent.  Lay the trap out and stake out the long edges. Then prop up the center with a trekking pole and then stake out front two corners. While easy one drawback is no floor.


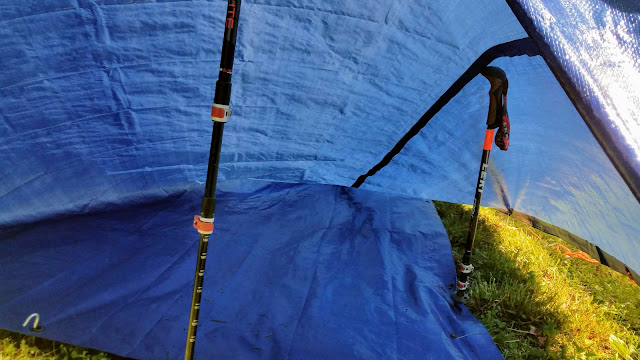
That is not the case with the next design, the Jordy. You again lay the tarp flat, but this time you stake out the left corners and midpoint of the front edge. I don't know if I got this part exactly right but I used one trekking pole at the midpoint of the top edge and then one on the inside. Then I staked out the left and right front corners. I then tied a guide wire to try and pop out the side.  It has a floor, door, and vestibule. I think I will need some practice, but I would sleep in it. However, you can't beat the price...about eight dollars!